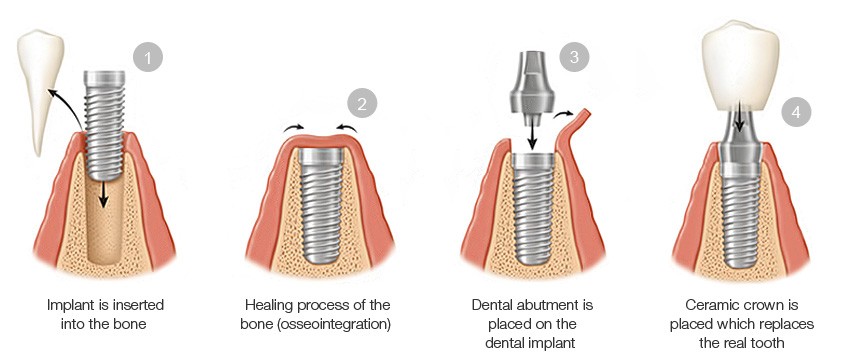
A dental implant is an artificial tooth root made of titanium that is inserted into the upper or lower jawbone and used to support a crown, bridge or denture that replaces one or more missing teeth.
Dental implant surgery is a multi-stage outpatient procedure that typically consists of 2 surgeries and several appointments over the course of 3 to 6 months. In general, the steps are as follows:
- Dentist determines if the patient is a candidate for implants
- Damaged tooth is removed
- Jawbone is prepared for surgery (eg. sinus lift, bone grafting)
- Implant is inserted into the jawbone
- Jawbone heals and fuses to the implant over several months
- A crown is attached to the implant, restoring the gap left by the missing tooth
In This Guide:
- Why it’s Done
- How Do Implants Work?
- Procedure
- 1) Evaluation and Preparation
- 2) First Surgery & Implant Placement
- 3) Placement of Temporary Crown
- 4) Placement of the Permanent Crown
- Post-Surgery Recovery
- Same Day Dental Implants or “Teeth in a Day”
- What is the Success Rate?
- Risks
- 3 Aftercare Tips
Why it’s done
Implant surgery may be worth considering if you:
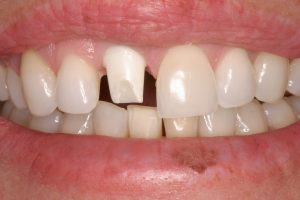
- Have one or more missing teeth
- Have adequate bone to support an implant (or are prepared to have a bone graft)
- Are in reasonable oral and general health
- Are fed up with loose dentures or are facing tooth loss and do not want dentures
- Are willing to wait several months for the procedure to be completed
- Want a long-lasting solution to tooth loss

How Do Implants Work?
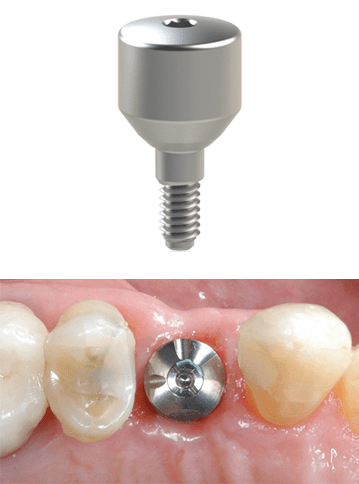
A dental implant restoration consists of 3 main components:
Implant
Made of titanium, it is inserted into the upper or lower jawbone and acts as an artificial tooth root.
Abutment
Made of porcelain, titanium or gold, it screws into the implant and provides the surface onto which the crown is cemented. Looks very similar to a natural tooth that has been shaved down to prepare for a bridge or crown.
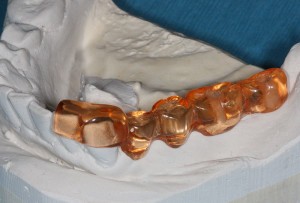
Restoration (Crown, Bridge or Denture)
Made of porcelain, metal or most commonly porcelain fused to metal, the restoration is the bridge, crown or denture that looks like a real tooth and is cemented onto the abutment.
Procedure
From the first consultation appointment to cementing the final crown, the procedure typically takes a minimum of 5 months for an implant in the lower jaw and 6 months for one in the upper jaw.
Two surgical procedures are typically required, but if additional bone or space is needed to make an implant site viable, then additional procedures such as a bone graft and sinus lift will be necessary and can extend the timeline to a year or more in total.
The implant procedure timeline also depends on: the rate at which the patient heals, condition of the jawbone, type of implant used, location and number of teeth being restored as well as technique used to place the implant(s).
Your dentist or implant specialist should be able to provide you with a detailed treatment plan including an estimated timeline of each appointment and surgery in the process after an initial consultation and examination.
1) Evaluation and Preparation
The first step is to visit a trusted dentist or implant specialist (prosthodontist) who will perform a comprehensive evaluation and examination.
They will need to know your full medical and dental histories, including any medications you are taking as they could affect your surgery or the healing process.
They will also examine your mouth to make sure you don’t have any dental health problems that must be treated before your implants are placed.
It is very important to to be properly and thoroughly assessed by your dentist prior to surgery to determine if you have any contraindications (risk factors).
Once you’re approved, various diagnostic tests must be carried out in order for the procedure to be properly planned and executed.
Diagnostic Tests
If you decide to proceed after discussing the results of the initial assessment, they will take x-rays, a CT scan of your mouth, “before” photos photos and impressions of your existing teeth.
These diagnostic tests will help your dentist plan the surgery as they determine the location of your sinus cavities, nerves and blood vessels so they are avoided during surgery, as well as the mass and density of jawbone that is available to support the implants.
Surgical Guide
A surgical guide is then custom made using the impressions that were taken. It is used during surgery to guide the dentist’s drill and pinpoint the exact location for the implant.
The accuracy of this process is absolutely vital as the implant must be placed in good quality bone and avoid sensitive and vulnerable areas in your mouth.
When Bone Grafting is Required
1+ surgeries then 3-12 months of healing.
If the X-rays show that your jawbone isn’t thick enough to support an implant or you don’t have sufficient bone density, a bone graft may be required to build up the bone. This is often the case when a tooth has been missing for a long time because bone density decreases over time when there is no tooth root stimulating the jawbone.
The bone used in grafting can be taken from your chin, hip or hip, processed cow or pig bone or synthetic material such as calcium phosphate or hydroxyapatite.
An alternative to grafting, bone distraction which is a procedure that involves pulling apart the existing bone at the site with screws and pins and letting it heal to fill in the gaps.
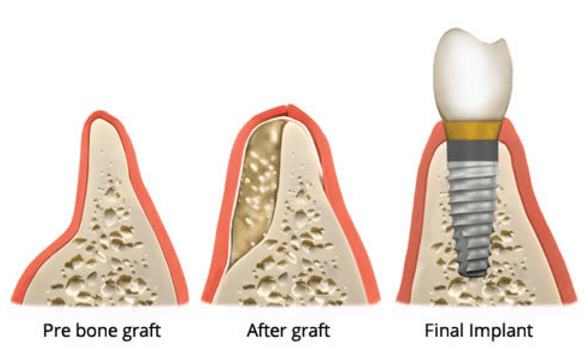
Bone grafts can sometimes be done during the surgery to place the dental implant, but large grafts (more than 1 implant or a lot of bone tissue involved) must be done in a separate procedure beforehand.
If a graft is necessary, it will add one or more surgeries and from 3 to 12 months of healing to the timeline. If no bone grafting is required, you can ignore this section and keep reading:
2) First Surgery & Implant Placement
1 surgery followed by 3 to 6 months of healing.
Once your dentist has confirmed that there is enough bone in your jaw to support the implant(s) successfully, the first surgery can be scheduled.
The first surgery is to place the implant(s) into your jawbone in the space created by the missing tooth and takes around 1 to 2 hours. It is performed by an oral surgeon, periodontist or dentist who has additional training in implantology.
Most dental implants are placed with the use of a local anesthetic. If you are nervous about the procedure or getting multiple implants, then you should ask to be sedated by nitrous oxide (laughing gas), or oral/intravenous sedation. Your surgeon should discuss all of these options with you.
First, a small incision is made in the gums to expose the bone.
The surgical guide is then positioned in the mouth onto the existing teeth and over the gap of missing teeth to indicate where implants must be placed.
Using the guide to align the drill, your dentist will then drill into your jawbone, gradually widening the hole until it is the correct size for the dental implant. This stage is critical as the jawbone must be treated very carefully to avoid damaging the surrounding bone (bone burn) or nearby nerves and sinus cavities.
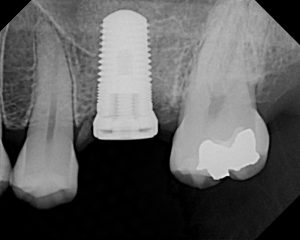
The implant is then screwed down into place until it is flush with the bone.
Next, the gum tissue is folded over the implant and stitched back into position. This ensures the area is protected from any external forces, allowing it to heal and integrate with the implant – a process known as osseointegration.
Healing and Bone Growth (Osseointegration)
New bone cells grow on and around the implant, fusing it into your jawbone. The time it takes to fully integrate with the surrounding bone varies from person to person, but typically takes 3 to 6 months.
Once this process is complete, the second stage of surgery can begin.
3) Placement of Temporary Crown
1 surgery then 4 to 6 weeks with the temporary crown while the permanent one is fabricated.
Your dentist will take an x-ray to confirm that the implant has fused with the surrounding jawbone. If it has, then they will schedule the second surgery.
The second surgery is much quicker, simpler and less-invasive than the first.
First, your dentist will make an excision in the gum tissue to expose the top of the implant(s).
After confirming that the implant has fully integrated with your jawbone, a healing cap (or “collar”) is screwed into it. The collar is a smooth, rounded piece of metal that guides the gum tissue into healing in the correct size and shape.
The collar is left in place and the gums are given 10 to 14 days to heal around it. This way your gums will fit around the crown in the same way as your natural teeth.
If you had a removable partial denture before getting implants, your dentist will modify it so it will fit over the healing cap during this time.
Once the gums have healed tightly to the collar, the collar is removed.
The abutment is then screwed into the implant using special equipment to ensure it won’t come loose. It provides the surface area needed to attach and support the temporary crown.
An impression is then taken of your abutment(s) as well as the surrounding teeth and gums and used to fabricate the final restorations.
After the impression is taken, the dentist will attach a temporary crown onto the abutment. It is made of a softer material than the final crown which allows it to protect the implant from the forces of biting and chewing while the healing process takes place.
Note: Depending on their approach, your dentist may skip the healing cap step and place the abutment and temporary crown during the second surgery after uncovering the implant.
4) Placement of the Permanent Crown
The permanent crown is fabricated over the course of 2 to 3 weeks while you are wearing the temporary crown.
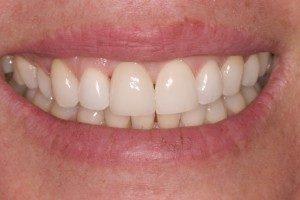
Once it is ready, the new custom-made tooth (restoration) is cemented or screwed onto the abutment. This completes your smile and restores your ability to talk and eat normally.
Cement is a better option because it avoids the need for there to be a screw hole in the crown. On the other hand, screw-in crowns are easier to remove if your dentist needs to look at the implant.
Fixed vs. Removable Restorations
A fixed prosthesis is a crown or bridge that is screwed or cemented into place and can only be removed by your dentist.
A removable restoration has special attachments which can clip onto the abutments or over a bar that is attached to the abutments. One example is a partial or complete implant-retained denture.
Same Day Dental Implants or “Teeth in a Day”
Using this alternative technique, your dentist may be able to attach the abutment and crown during the same appointment that the implant is placed. This is known as “immediate loading” or “same day dental implants“.
This approach is most commonly used for All-on-4 upper or lower dentures because the implants are joined together by the rigid denture and can share the loads applied to them through biting and chewing. Any force that would cause any one implant to fail is distributed among several implants.
For single implants (typically only for implants located near the front of the mouth), the dentist will install a temporary crown that is positioned so that it cannot come into contact with opposing teeth. This provides the look of a full set of teeth, but protects the implant from some of the forces of chewing and biting and lowers the risk of failure.
Post-Surgery Recovery
It is important to follow all instructions given by your dentist. You will need to stick to eating soft foods for the first few days after surgery, gradually re-introducing harder foods as the implant site begins to heal.
Good oral hygiene is essential as the surgery site must remain clean and free from infection so it can heal properly. They may provide you with a prescription for medicated mouthwash which should be used as directed.
Discomfort should be minimal and easily managed with over-the-counter painkillers. Common side effects after the surgery include:
- Minor bleeding
- Minor bruising
- Slight facial swelling and swelling of the gums
Almost all of the swelling should be gone in the first 3-5 days after the surgery and the pain should be almost completely gone after 7-10 days.
3 Aftercare & Follow-Up Tips
The procedure is more likely to be problem-free if you:
1) Have Excellent Oral Hygiene
It is vital to ensure you clean around your implant thoroughly so it is kept free from plaque and food debris. They will show you the best way to clean an implant and give you special interdental brushes or soft/water picks to help you clean the area more effectively.
Failure to brush and floss properly is the main reason for implant failure as it can cause the bone and gum tissue surrounding the implant to become infected.
2) Get Regular Check-ups
Visit the dentist every six months for check-ups and cleanings, or more frequently if recommended. This will help keep your mouth healthy and catch any problems that arise.
3) Avoid Bad Habits
That could damage your dental implants. Don’t chew on ice, hard candy or other hard substances as this could damage your implant crowns, or even your natural teeth.
What is the Success Rate?
Dental implant surgery is generally very successful with rates typically between 95% and 97% (see this study and this one for statistics), but everyone is different and your dentist can discuss your suitability as well as their personal success rate.
Risks
All surgeries involve some amount of risk, and placing dental implants is no exception. That said, problems with dental implant surgery are rare and tend to be minor and easily treatable. Risks include:
Infection
While rare, if there is bacteria present during surgery, an infection may develop near or under the implant which can cause it to fail.
Excessive Force
An implant may also fail if it is subjected to an excessive amount of force from grinding, clenching or biting hard objects. This can also happen if the teeth (artificial and natural) don’t fit together properly when the patient bites down.
These pressures may cause bone loss around the implant which can cause it to become loose and eventually fail.
Nerve Damage
There is a major nerve that runs through your lower jawbone. This nerve can be damaged by the drill or implant placement during surgery, which can cause numbness, pain or a tingling sensation in the jaw, lip, tongue or chin area. In some cases the nerve is able to heal completely and the numbness is temporary, but it can also be permanent.
This problem is very rare as long as your dentist takes a computed tomography (CT) scan and X-rays beforehand to locate and avoid the nerve.
Sinus Problems
If an implant being placed in the upper jaw is placed too near or protrudes into the sinus cavity (located above your upper teeth) it will cause significant discomfort and potentially an infection.
To prevent this from happening, your dentist will use the X-rays taken during the initial examination to locate and avoid your sinuses and nerves.
Damage to Nearby Blood Vessels and Teeth
Placing an implant is a delicate and challenging procedure, but a skilled and experienced surgeon will not damage any nearby structures including teeth and blood vessels.
Here are detailed descriptions of the issues that an implant can potentially run into.
What to Read Next
Alternative Techniques
Other
- Find a Dentist Using Our Clinic Locator Map
- Dental Implants vs. Dentures
- How to Much Do Dental Implants Cost?
I also have had the all on four by Clear Choice. They are very professional and caring. Yes there is a transition period of soft foods and specific dental hygiene. But this is life changing! So far so good after two months and I love my smile! Looking forward to my final set 😁